- Home Page
- Blog

Introduction
This is the easiest course about CPA marketing using Push traffic! And it’s available absolutely for free!
This tutorial contains all the information you need to easily launch your Push campaigns for the most popular arbitrage verticals!
● The course is specifically designed as an introduction to CPA marketing using Push traffic.
● Suitable even for complete beginners!
Everything is explained simply and clearly, without any excessive jargon.
● Practice is key!
The course is written in the practical style, accompanied by detailed information about all the ins and outs of the workflow and live examples.
● Created by and for affiliates.
The course was created by the media buying team of Push.House, CPA.House, Spy.House.
What will you learn?
-> What is Push traffic and how to work with it.
-> What verticals are suitable for Push traffic.
-> How to create a good creative for the Push format.
-> How to use the Spy service correctly.
-> Split testing of creatives and campaigns.
-> How to quickly gain profit.
What are push notifications, and how do they work?
A push notification is a short message in an app, browser, or notification shade on phones that pops up for subscribed users. Push notifications usually include several components, such as Title, Text, Icon, and Main Image.

In CPA marketing, Push traffic is often used because it is considered cheaper than other common formats, for example, social networks. It also outperforms many other cheap formats like PopUnder.
It is much easier to work with push notifications, as this format does not require any skills or a large budget.
Push notifications are the best ad format for beginners or affiliates with a small budget.
What is CPA marketing?
In a nutshell, we will create notifications and send them to subscribed users. Users who will be interested in your ad will go over and buy a product / register / call / subscribe (convert, in short), and you will receive a commission for this. Our task is to create a good creative, target users who are interested in our ads, and get rid of traffic that is not interested in our ads.
The sites we will work with:
Push.House
In order to start, you need to familiarize yourself with the sites that we will work with.
The first of these is Push.House. This is the ad network where we will create notifications that will be shown to the subscriber base. Interested users will follow the link and possibly convert.
First, you need to register on the site. We recommend that you do this right now, before continuing with the course.
Now, after creating your account, you will be taken to your personal account in the Push.House system.
From here, you can create and customize your ad campaigns.
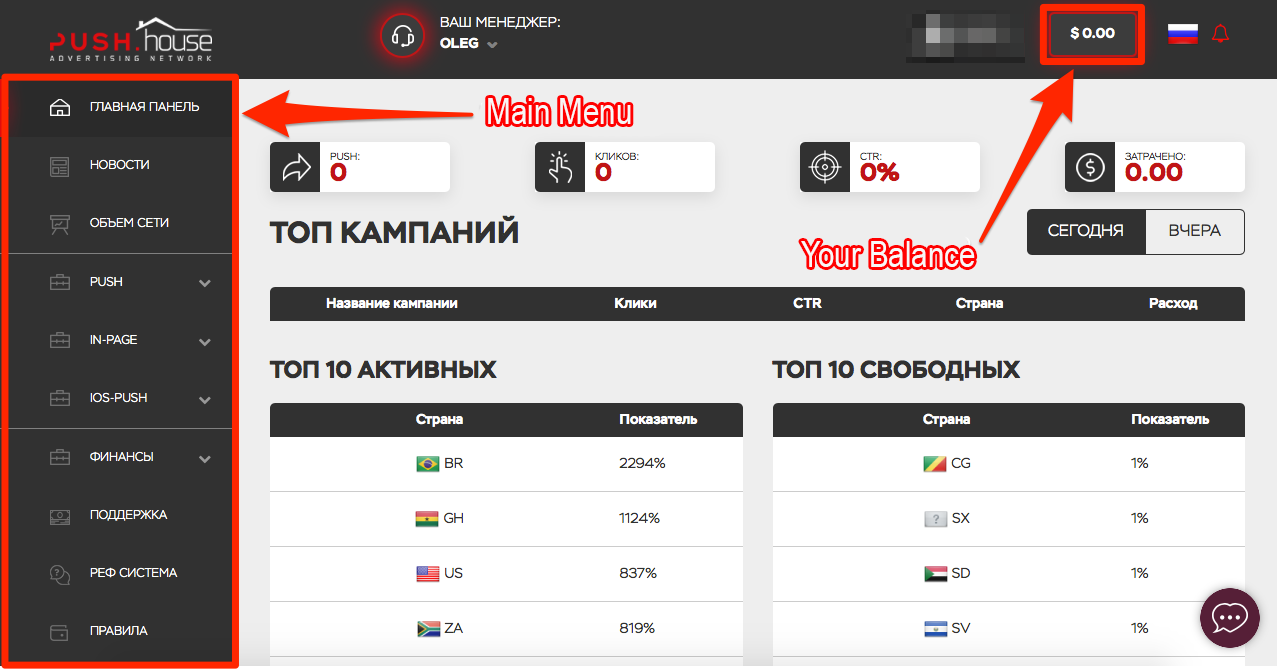
To work with Push.House and buy traffic, you must top up your balance. You can see your balance in the upper right corner of the site. At the moment, it is zero. In order to launch your campaigns and receive traffic, you must replenish your balance. The minimum deposit amount is $50. To top up the balance, go to the "Finance -> Top up" section in the Main Menu.
After replenishing your balance, you should familiarize yourself with the functionality of the site.
You can find out the traffic volume for each GEO in the "Network Volume" section.
Most of the work will take place in the "Push", "In-Page" and "IOS-Push" sections, as these sections are responsible for creating, customizing and optimizing your campaigns.
Push.House has different formats for push notifications.
Push: This is the standard notification that pops up on the user's screen.
In-Page: notifications that are sent to users inside a site page.
IOS-Push: notifications created for Apple device users.
CPA.House
CPA.House is the second site we should learn about before starting.
CPA.House, as the name implies, is a CPA network from which we will take offers.
Just like with the previous site, you must register to work with CPA.House.
After registration, you will have access to your personal account.
Here we will look for offers that are suitable for us and create links to which we will further drive our traffic.
In CPA.House we will study the statistics of our traffic, which is a KEY factor in CPA marketing that determines how profitable our campaigns will be.
The advanced internal tracker at CPA.House will help you analyze your traffic without the cost of buying a third-party tracker.
Spy.House
The last site we will look at before starting will be Spy.House.
Spy.House is a free online ad monitoring site, or, in other words, a spy service.
Most of the professional spy services are paid, so Spy.House is the best solution for us, as it is completely free.
All you have to do is to go through a short registration, after which all the functionality of this service will be available to you.
Why do I need a spy service?
Creating a creative that suits your target audience is one of the most difficult tasks in CPA marketing. Spy services give you the opportunity to see what your competitors are doing and how well their approaches are performing. Based on this, you can copy or create similar creatives without wasting a lot of your time.
Before continuing the course, we advise you to register at Spy.House and carefully study it. A detailed analysis of how to work with the spy service will be described below.
GEO selection
The very first step in an CPA marketing business is market research. Before creating an advertisement and getting money for it, you need to study in detail the countries that are performing well at a given time and choose a suitable offer for this country.
It starts with an analysis of traffic volumes in Push.House.
Go to the "Network Volume" section, and you will see a table with countries.
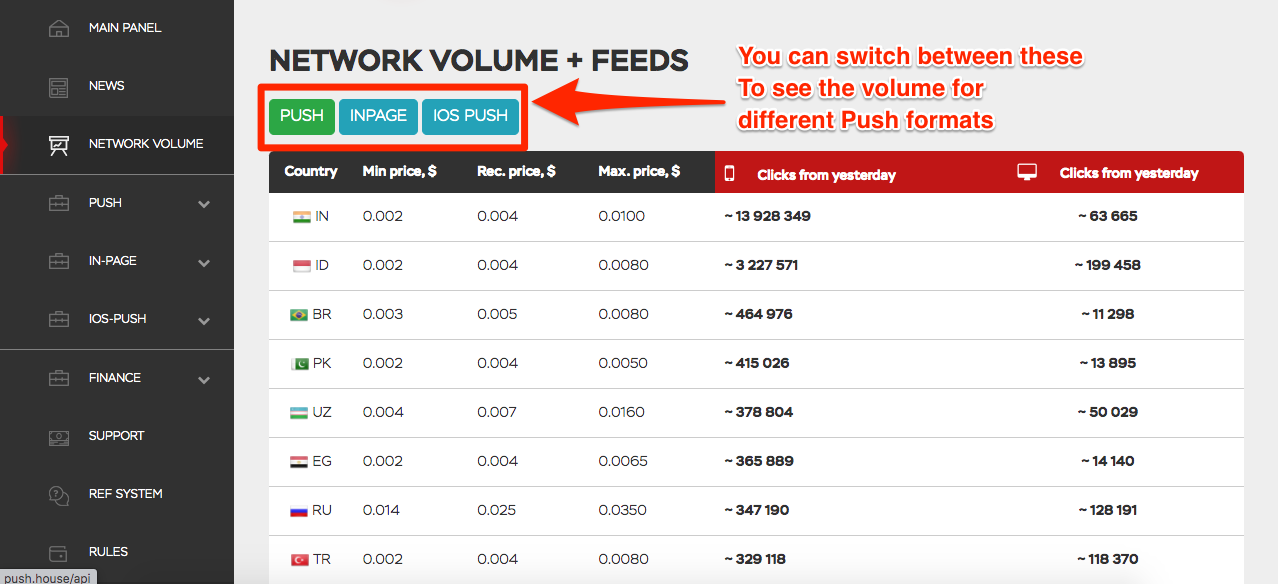
Here you can find a lot of useful information: traffic volume to any GEO in the last 24 hours, CPC, etc.
Why is this information important?
The higher the country in the table, the more subscribers there are in that country, and accordingly, more people will see your ad. Also, the more clicks in a country, the more webmasters create ads there. For example, in the image above, India is at the very top, which means this GEO has had the most traffic in the last 24 hours.
How to choose the right GEO?
When choosing the right GEO, there are several factors to consider: traffic volume and cost per click. We are looking for countries where there is a lot of traffic and the cost per click is not that high.
The optimal solution in our case might be AE. There is traffic there, and the cost per click is very low.
Selecting an offer
After selecting a country, your next step should be to choose an offer for your GEO.
To do this, log into your CPA.House account and go to the "Offers" section.
Since there are many offers, it is better to use filtering to quickly find what you are interested in.
Select "UAE" from the "Countries" sub-menu and click "Apply".
Now you will see only offers for this GEO.
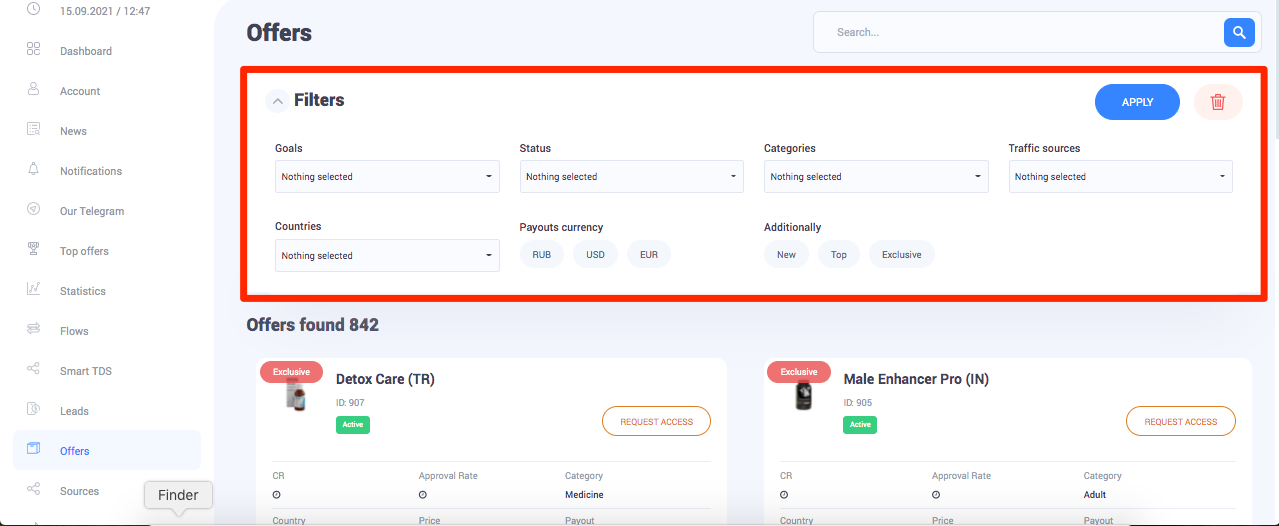
For the sake of this tutorial, we will choose the Max Man (AE) offer, as we know that it is perfect for beginners.
Please note that not all countries respond equally to all verticals. Before launching any campaign, you should study the GEO you want to work with, see what people love in your chosen country. Look at the official languages and the indicator of the time of day - when people surf the Internet the most.
Offer card
To choose offers yourself in the future, you need to understand what all the parameters in the offer card mean.
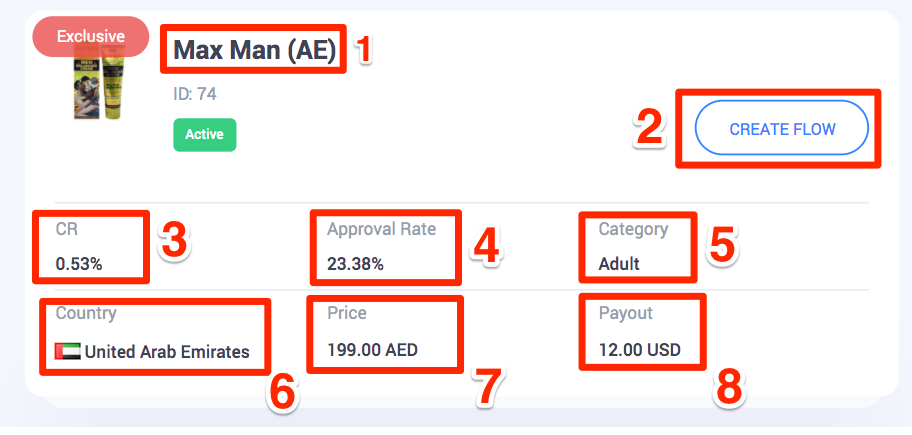
1. The name and the ID of the offer.
2. The access request button, after receiving acess it will change to "Create flow".
3. CR is a parameter showing the percentage of clicks for this offer. That is, the percentage of clicks on the ads and transitions to the landing page.
4. Approval is the percentage of leads accepted by the advertiser. This parameter should be given special attention, as it is very important, because the higher the approval percentage, the higher the chance of getting paid for each lead.
5. Offer category. There are many categories in CPA marketing, and as it is a growing market, new verticals emerge almost every year.
6. Country for which the offer was created. Remember that you cannot create advertisements for offers for other countries, because it is a waste of money and time. The advertiser will not pay you for this.
7. Product cost.
8. The amount you receive in case of a successful sale.
Offer page
For more information about the offer, click on its name. This should redirect you to the offer page where you can find out the offer rules, accepted traffic sources, payouts, working hours of the Call Center, and, of course, prelanding and landing pages.
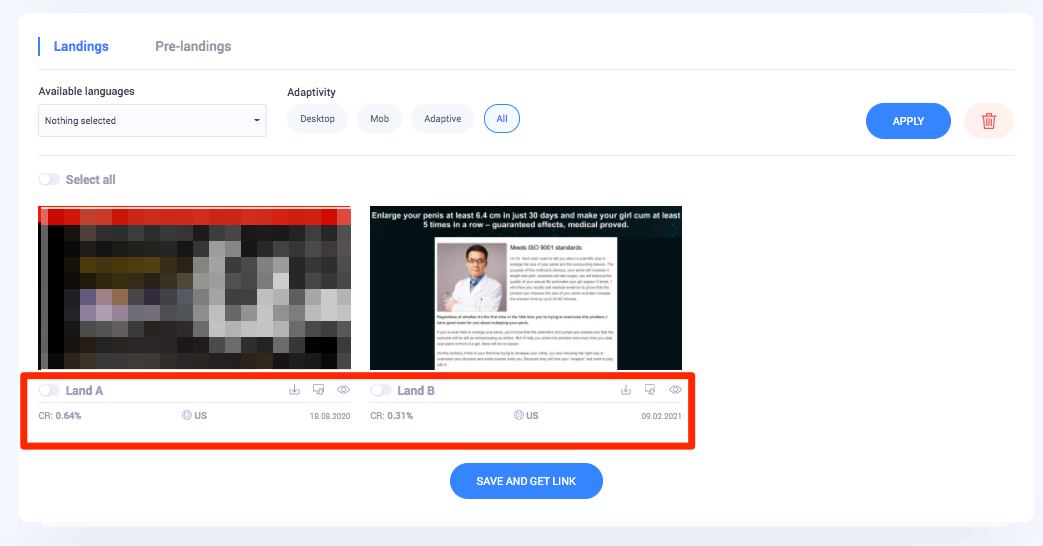
Landing pages are pages to which the user will be directed if they click on your ad. You can view all landing pages by clicking on the eye icon.
Traffic interacts differently with different landing pages, so you should try each one with a different ad approach to see what works best for your traffic.
Under each of the landing pages, you can see the percentage of CR, thereby you can understand which landing pages perform best according to the system statistics.
You can also use multiple landing pages at the same time, this is called split testing. When using multiple landing pages, the system will send traffic to all landing pages evenly.
Creating your first flow in CPA.House
The next task will be to create a flow in CPA.House.
A flow is a link created in an affiliate network that includes parameters selected by the webmaster. The flow contains information about the selected landing page, prelanding page, offer, etc. without it, CPA marketing is not possible.
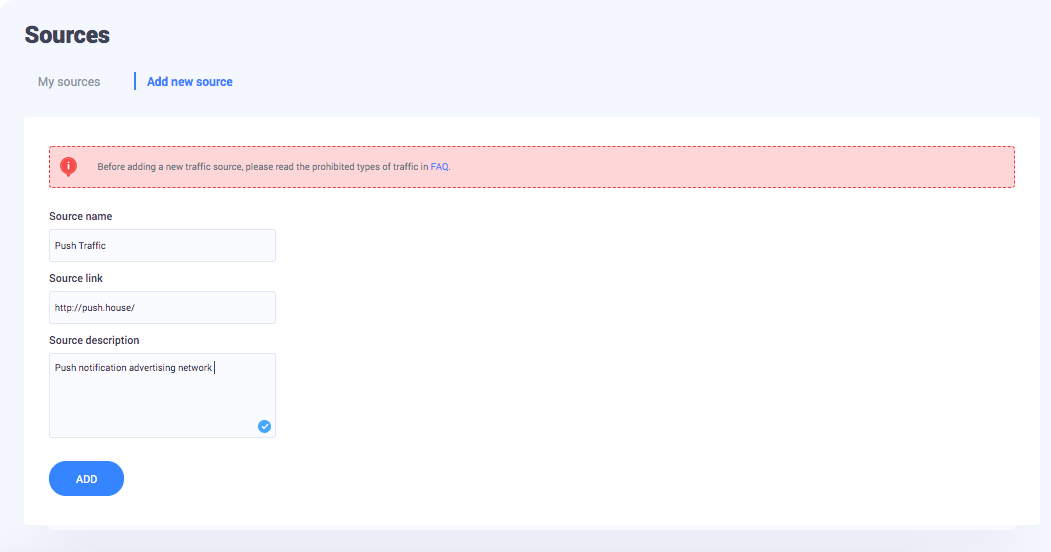
To create a flow in CPA.House, you must first create your traffic source. To do this, go to the "Sources" section in the Main Menu.
In the "Sources" section, click on "Add a new source".
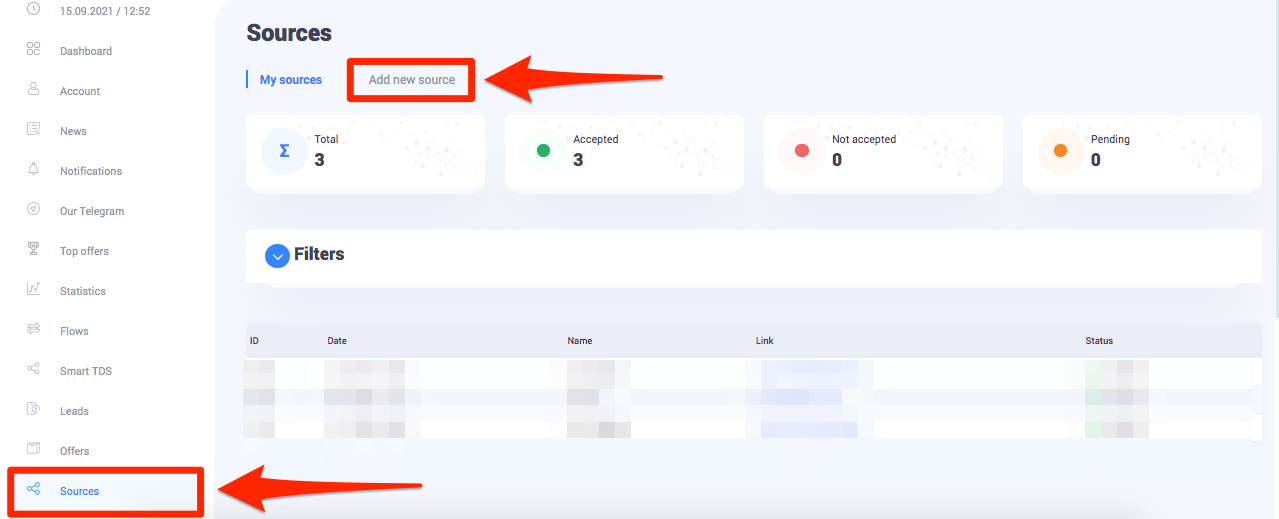
To create your traffic source, provide the name of the source, a link, and a short description. Below is shown how this is done using the example of Push.House.
After adding the source, everything is ready to create a flow.
Return to the "Offers" section and find your chosen offer. Click on "Request Access" and fill out a short form. Clarify the source of your traffic that you just created and indicate the planned amount of leads per day. Click "Submit" and access will be opened.
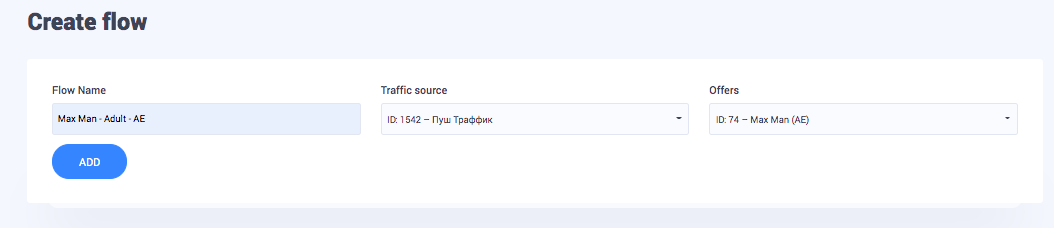
You will be redirected to the flow creation page.
Enter your flow name and source. Click Add.
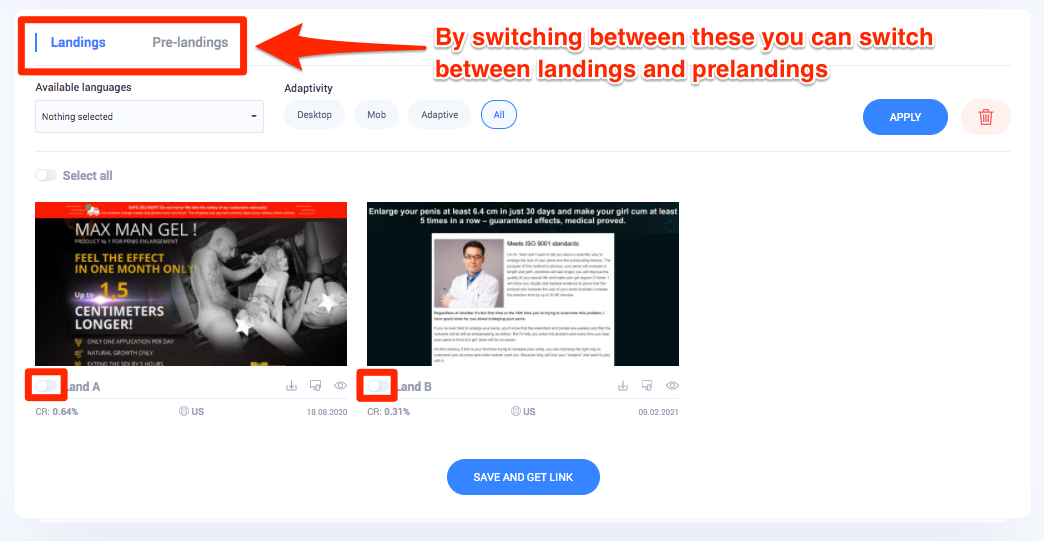
At this stage, you need to select prelanding and landing pages. You can do this by clicking on the switch under each landing page.
You can select several landing pages and the system will distribute your traffic evenly across all selected landing pages.
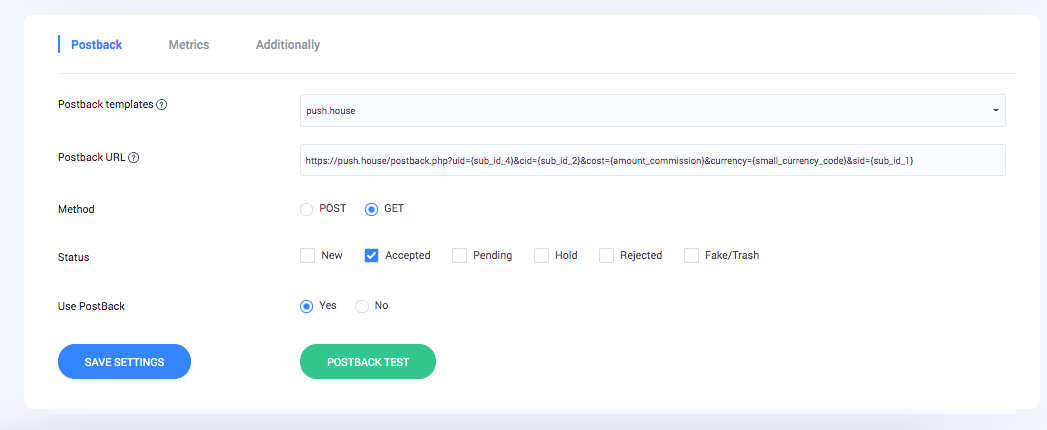
The final step will be setting up Postback. Because will work with Push.House, everything is extremely simple here.
Select "push.house" from the list of Postback templates, and the Postback link field will be filled in automatically. Then select "Accepted" from the statuses, and do not forget to indicate "Yes" in "Use PostBack". Click "Save Settings" and thus Postback is ready.
Click "Save and Get Link".
You will be redirected to a page with a link to your flow. Here, as in the section with Postback, everything is extremely simple. Select Push.House from the list of templates, and the system will automatically insert the necessary macros into the link.
You can read more about macros and Postback settings here:
https://cpa.house/blog/what-is-postback-and-how-to-set-it-up-20
Creation of your creative
The affiliate link is ready, now is the time to think about creating an ad. In order to not waste a lot of our time, let's use the spy service.
Despite the fact that Push.House allows the use of links with pornographic content, pornographic creatives are prohibited!
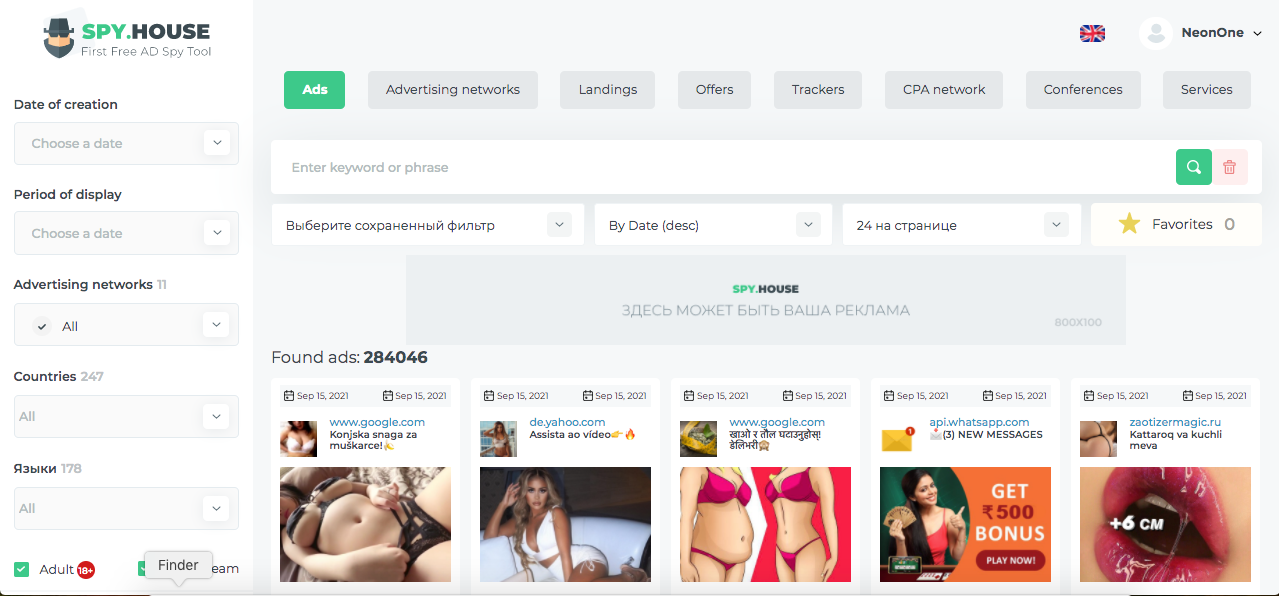
Log into your Spy.House account.
On the left is the main menu, where you'll set up your search. This will help you to see what other webmasters are creating for similar offers.
First, let's take a look at how to customize your search.
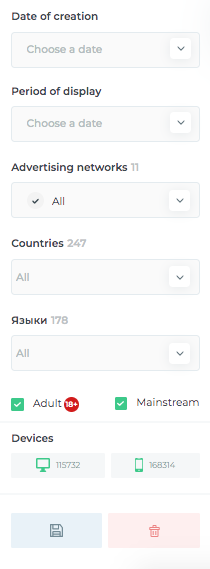
The first parameter is the date. You can filter ads by publication date or display period. For example, maybe you want to know what was the most popular ad in the country of your choice last week. Here you can set the dates and the system will give you all the ads that were active for the period you specified.
Next up are ad networks. Here you can select one, several, or all ad networks. When selecting an ad network, you will see only ads generated on that network. Thus, if you need to see your competitors' advertisements on Push.House, you should only select this ad network.
The third parameter is countries. Using this parameter, you can filter ads based on the countries in which they were shown.
It is also possible to select only "+18" ads if you are interested, or filter by device, Desktop or Mobile.
In our case, we will leave our search more or less general.
The dates are not relevant for us, so we skip this parameter.
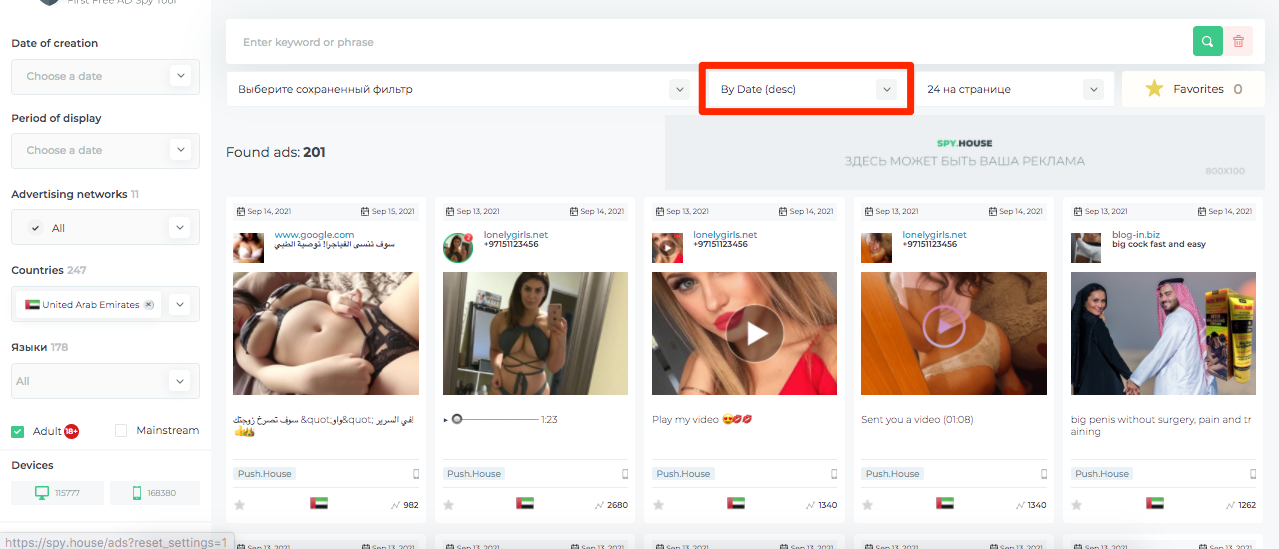
We will select all advertising networks except Push.House. You don't need to do this, it's just a personal preference based on the fact that we will be running ads in Push.House, so it's better to look for ideas elsewhere so as not to duplicate the ads that are already running in Push.House.
Next, we select a country, in our case it's the United Arab Emirates.
Leave the rest as is and click "Apply".
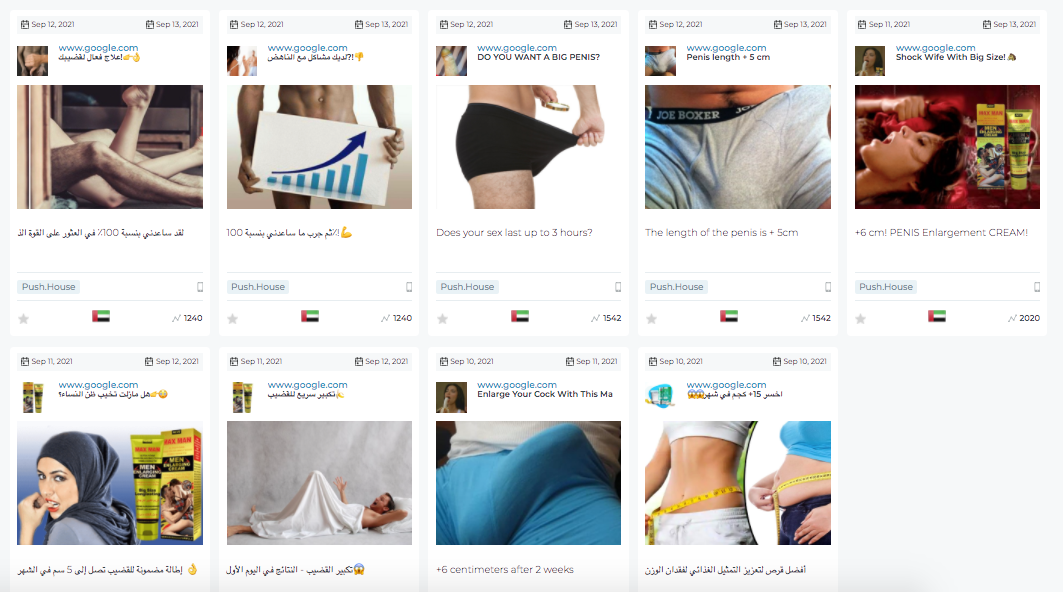
As you can see, there are quite a few ad creatives on the topic we need. It is desirable that the results are displayed by the number of views. The image below shows how to set it up.
Browse the creatives and pick 5-10 pieces with good number of views.
Create a document where you can collect all the texts from your chosen creatives.
At this stage, your task is to create the same number of creatives with similar texts. You can do this either yourself or using text spinners.
A text spinner is a utility that creates a unique text based on the text you provide.
Examples of free spinners:
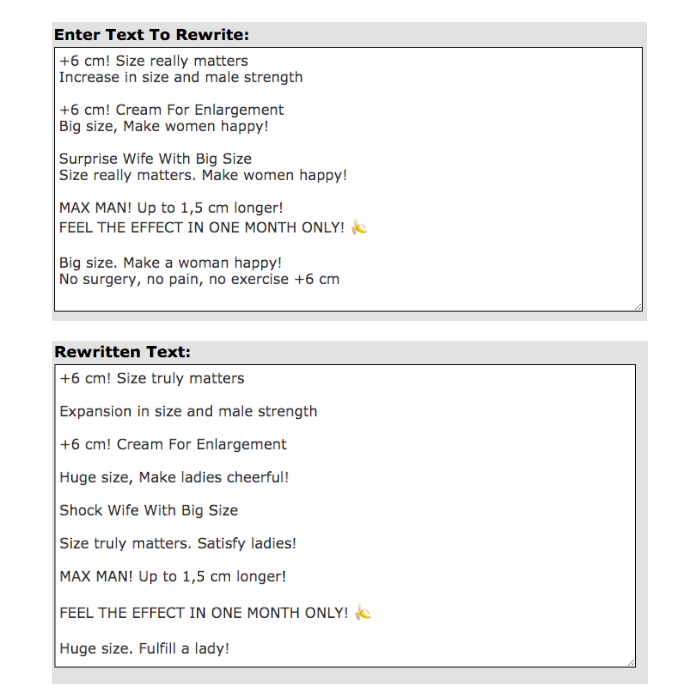
Now we have unique texts to use in our creatives. It's time to start creating pictures. At Spy.House, we saw what images affiliates use in their creatives, we should do something similar.
It is best to use Photoshop or Canva to create quality images.
Sites with free stock images are perfect for finding images to work with:
You can also use photos found on social networks.
All photos are best to be edited manually using the image editors mentioned above.
First, you need to create an image for the desired size. For push notifications, this is 492x328px.
But one thing to keep in mind here is that the image is cropped at the top and bottom when the notification is displayed on the phone, so try to put the most important info in the center.
The image below illustrates where it is best to target important discount text or a call to action.
There are no rules for creating creative, so if you are new to this, just do like others. Over time, you will understand which approaches perform better than others and can optimize and improve them.
Creating a campaign in Push.House
Our work is almost over! We just need to create campaigns in Push.House and people will start seeing our ads.
To create a campaign, we'll have to use everything we've learned in this lesson.
Log into your account at Push.House.
Go to the "Push -> Create Campaign" section.
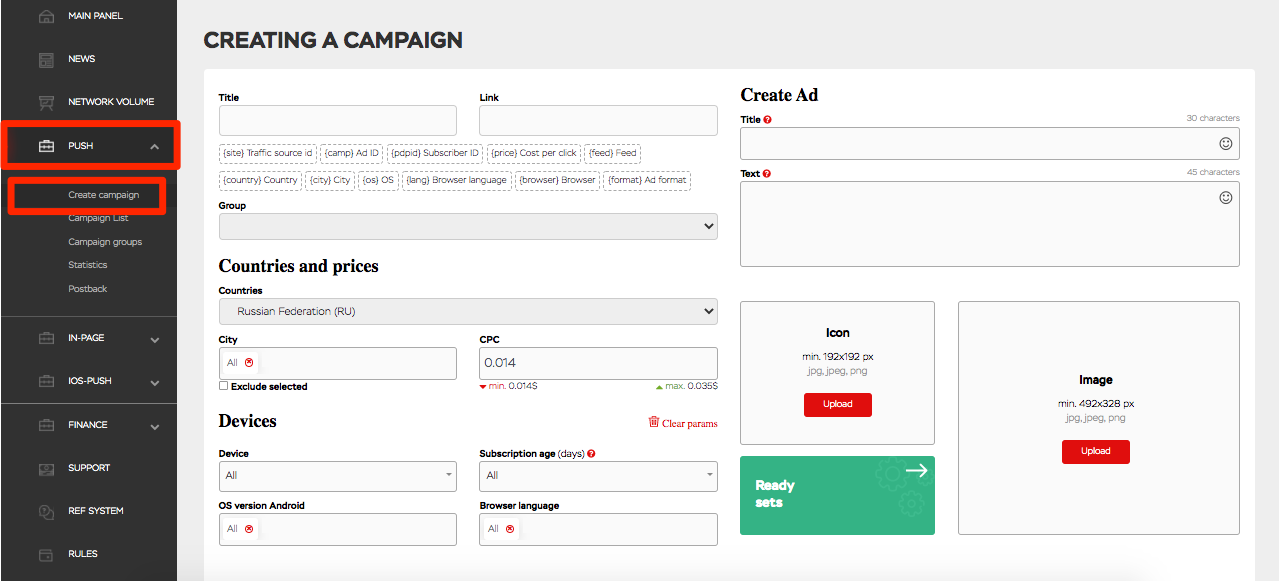
All the most important work will take place here.
First, we need to create a name for our campaign.
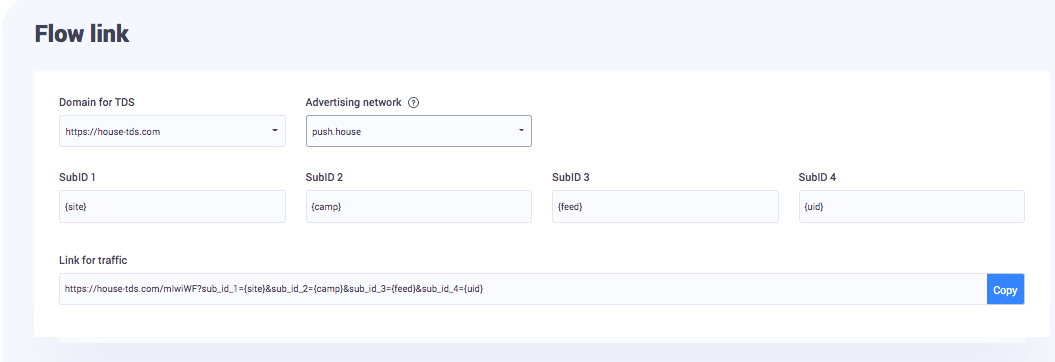
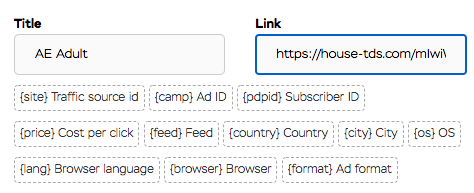
Now we need to add a link to our stream. Return to CPA.House, click "Flows".
Click on a link icon on the right side of the flow we created.
![]()
Select Push.House from ad network templates click "Copy".
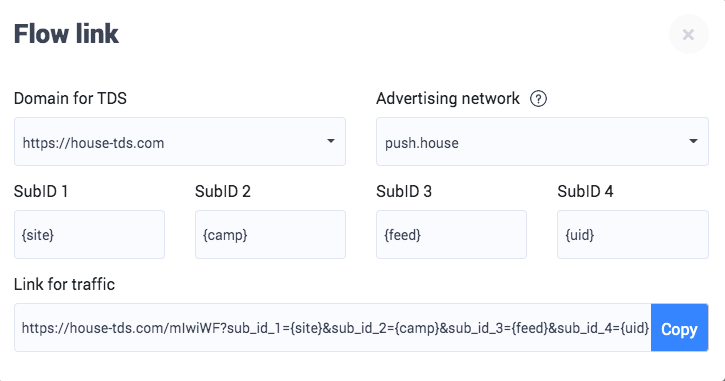
Return to Push.House and add the copied link in the "Link" field.
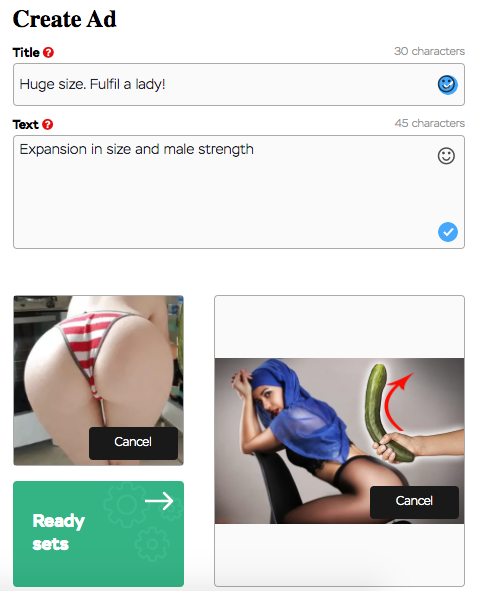
Now we need to create the ad itself (creative).
Add the Title and Text you created earlier in the spinner.
Add Icon and Image.
After creating the ad creative itself, all that remains is to set up our targeting.
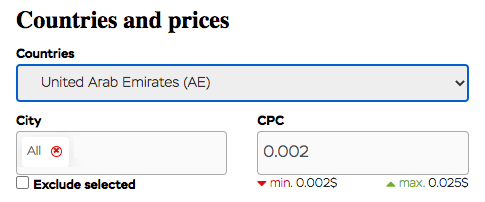
Select a country, in our case, it is the United Arab Emirates.
Specify your CPC bid. To do this, you need to understand how the Push.House bid auction works. The system sets the minimum rate for each country. You cannot create a bid below this price. You can find out the minimum bid under the CPC field. The system does not set the maximum bid, the maximum bid is created automatically in the auction. This means that the maximum bid is dynamic and changes depending on the price at which the webmaster receives traffic. At the time of this writing, the maximum AE bid is $ 0.012. The maximum bid is the highest price paid to date.
If tomorrow someone decides that the right decision would be to buy a click for one dollar at a time, then the maximum bid will be $1.
How to understand what CPC bid to use?
When starting out, it's always best to set a minimum price, launch a campaign, and look at the volume of traffic. In some countries with minimal competition, this may be enough to get a good amount of traffic. In other, more competitive GEOs, you have to fight for traffic and at the minimum rate you will not have enough traffic. In this case, you will have to gradually raise the rate and look at the results.
What affects the amount of traffic received?
The volume is not only affected by the bid. CTR is a very important factor.
CTR (Click Through Rate) is the ratio of the number of clicks on an ad to the number of impressions.
CTR affects your position in the rankings, and if you pay the maximum bid, but your creative is bad and users don't interact with it, you won't receive good amount of traffic.
The higher your ranking position, the more you will receive traffic and for a cheaper price. Your position is influenced by your bid and the click-through rate of your creative.
Targeting
Having indicated the country and your CPC, at the moment you do not need to do anything else here. In the next lessons, we will tell you how to optimize campaigns and for this, we need cities since we will turn off poor performing cities that negatively affect our ROI.
Sometimes the offer specifies the cities which you need to target your ad at, in this case this should be done immediately when launching the campaign.
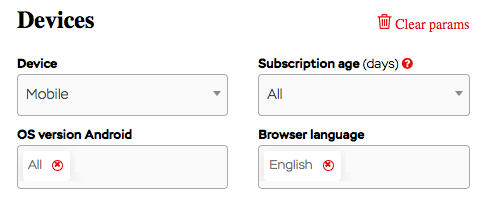
Next up in our targeting settings will be the "Devices" section.
Here you can choose if you want ads to be shown only on phones or only on desktops.
It is important to know that the CPC on desktop is equal to half the CPC on mobile.
If you've decided that you want to run your ad on both phones and computers, it's best to create two different campaigns. If you select all devices in one campaign, you will pay the same CPC from your computer and from your phone.
The browser language is suitable for targeting in countries where more than one language is spoken.
In our case, this parameter will be very useful. Firstly, our offer is in English, which means that it is aimed at expats, not UAE citizens, and this is understandable. At the moment, there are 88.5% of emigrants in the Emirates and only 11.5% of citizens.
To target this particular segment of the population, you can use the browser language parameter.
So let’s do it by choosing English.
The OS version is not important at the moment, but it may be useful later.
In this section, we only have to deal with the last parameter, "Subscription age".
This is a setting for targeting users by subscription age. The newer a user's subscription is, the more expensive their click is. This is based on the fact that the new user is not so tired of advertising and therefore interacts with it better. For now, we will leave this parameter as it is, to avoid unnecessary waste of funds.
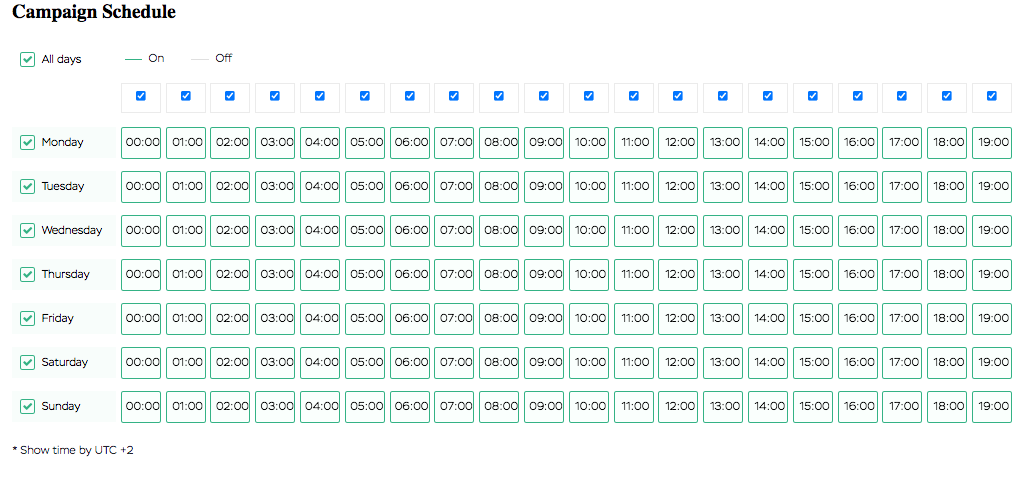
Next on the list is the "Schedule".
This parameter is useful if you need to specify the days and hours of your ad display. It is a common practice to run your ad only during the working hours of the offer Call Center.
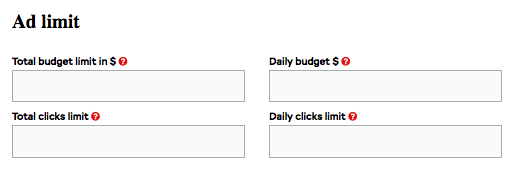
Limits
Daily and total limits can be set both in clicks and in dollars.
This is not necessary, but it is still better to set the limits so as not to drain the entire balance.
You can do it however you like, but we recommend 5k clicks on the first day will be enough.
Please note that limits may be exceeded. When the campaign reaches the limit, the ad stops and is no longer shown to new users, but if users who received the ad before this moment click on it after stopping, the cost of these clicks will be deducted from your balance.
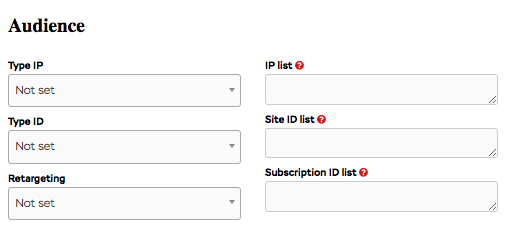
Audience
This is a more advanced section that we will use in the future. We don't need it at the moment. Here you can set black/white lists of sites or IP addresses.
Blacklist: a list of sites or IP addresses to which the campaign will not send traffic. Sites from which there is no profit are added to it.
White list: a list of sites or IP addresses that the campaign keeps in priority and drives as much traffic from there as possible. The sites in which the profits far exceed the costs are added here.
Skip this section for now.
Last settings
Just a little bit is left, and your first advertising campaign will be ready.
Let's take a look at the remaining settings.
Leave the parameter "Campaign uniqueness by" on "Ads", it is the best option for CPA marketing.
If you want to stop advertising after moderation, you can specify it here.
Be sure to indicate if your landing page contains pornographic content in order to properly distribute traffic.
Indicate if you want to use feeds.
Feeds are third-party subscriber bases that are not part of the Push.House database. If you do not have enough traffic from Push.House, you can connect feeds, but be careful, for this you must have at least $70 on your balance. If your balance drops to $69.99, feeds will be disabled instantly.

Split Testing
For correct and informative CPA marketing, you should always use split testing of creatives.
We recommend creating at least 5 campaigns with different texts and images. Launch them all at the same time, and after a while you will see which of the creatives have the highest CTR and give more leads. As a result, you will delete all non-working creatives, leaving only one or two with good results.
You can recreate all campaigns, but there is a quicker way.
In the list of campaigns in Push.House click on the "Copy" icon on the right of the campaign you have created to create a duplicate. A copy of your first campaign will be created. In it, click on "Edit" and change the body of the notification (Title, Text, Icon, Image).
Repeat this step until you have 5-10 campaigns.
Leave your campaigns spinning for a day and see the results.
Remove all unnecessary campaigns, leaving one, maximum two campaigns.
The first part of the course has come to an end.
We hope this tutorial has helped you understand the most basic aspects of CPA marketing.
If you still have questions after reading this lesson, please contact one of the managers.
@PushHouse_Adv for Russian speakers
@neonone123 for English speakers

Cool support
If you have any questions, you can write to any of our managers

