- Home Page
- Blog

Lesson 2: Complete advertising campaign optimization
Introduction
Welcome to the second lesson of our introductory course to affiliate marketing!
In the first lesson, we learned what affiliate marketing is, how to choose the best offer to run, how to create creatives and advertising campaigns.
Today's course is about optimizing your campaigns. We will teach you how to make advertising campaigns profitable by giving live examples.
Get comfortable, ladies and gentlemen, as we are going to learn how to make your campaigns profitable!
What is covered in this lesson?
- What is campaign optimization
- Optimization of landings and prelandings.
- How to create black/white lists.
- How to optimize by OS versions, cities, and browser languages
- And much more
Part 1: General Information
What is optimization?
Optimization is the process of improving the performance of your ads by selecting the parameters that give you the best results. In plain English, optimization is the process of removing all unnecessary traffic that eats up your budget in order to leave only the ones that give you profit.
How to optimize your Advertising Campaign
Optimization goes through many parameters of your traffic, which you can see in your statistics. We will look for poorly performing traffic segments and delete them one by one. Thus, after the completion of the optimization process, only the parameters that give your profit will remain.
When can you start optimizing?
There is no clear rule here. In general, you can start optimization after a few days of driving traffic, or after around 50 dollars spent on ads. If you only have 5-10 thousand clicks, it's too early to start. It is better to wait until you accumulate around 15-20k clicks so that there is some information in the statistics that you can work with.
Also, it is better to monitor your statistics daily, if you have one site that gives huge volumes, but bad conversion rate, a site like that should be removed instantly. But, again, don't fall into the trap of over-optimization. This happens when you start blacklisting everything after a couple of days. All you will achieve with this is eliminating all your traffic. Wait until you have enough data, and then move on to optimization.
How many clicks do you need to start optimization?
It all depends on the budget, CPC and payout of the offer. If, for example, you drive dating to an expensive GEO, like Canada, with a CPC of 0.02 and you have a payout of 1 dollar, then you can optimize after the first few thousand clicks, since the minimum number of clicks needed to understand whether the site gives you any profit is very small, in this situation.
If you are driving traffic from cheap GEO, where the CPC is only 0.002 and your payout is 7-8 dollars, you will have to wait a little longer here. At least 20-30 thousand clicks before optimization starts.
Part 2: Optimization
Optimization of prelandings and landings.
When creating a flow, it is necessary to select several prelandings and landings to try which combination is best. Thus, the system will automatically start sending traffic to all prelandings and landings equally. This is called split testing. After the initial budget is spent, around 2-3 times the cost of one conversion, you will see in the statistics which combination of prelanding + landing gives the best CR, gives more leads and the highest Approval rate.
Then your task is to disable all the prelandings and landings that don’t work for you, leaving only the best combination.
Let's look at this with an example:
Note: all examples given in this lesson are created to show the logic of optimization and may not be sufficient for making decisions and conclusions in reality.
For example, let's take the offer Alpha Gen (EG)
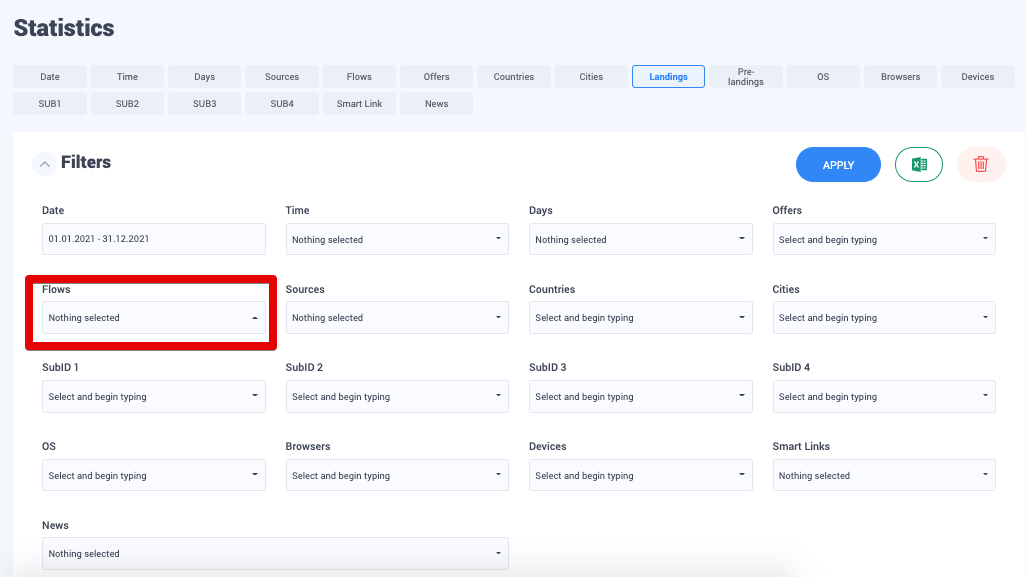
At the beginning, two landing pages were used in the flow. To see them we will have to go to the "Statistics" section and select "Landings"
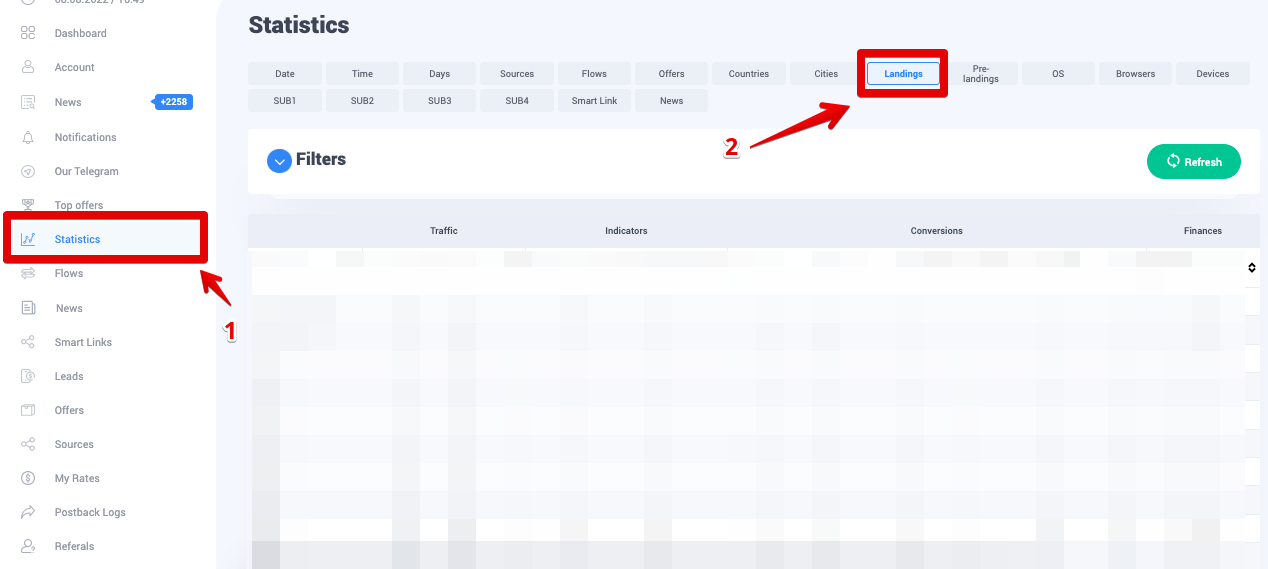
Click on "Filters" to open the menu and select your flow from the "Flows" menu. Click "Apply".
This way you will be able to see how much traffic has been driven to each of the landing pages we have chosen and what is the percentage of CR. Also here you will see all the information you need on the leads received for each of the landings.

And so, in our example, it can be seen that the traffic received is approximately the same for each landing page. Now let's look at the CR percentage of the approval. It is immediately clear that landing A has a much higher CR percentage. Do you know what that means? This means that you get the leads cheaper using Landing A. Not sure how? Let's count:
Let's say we ran our campaign at 0.002 CPC. Multiply the CPC by the number of clicks on Landing B.
0.002 x 2855 = 5.71
Now let's divide this by the number of leads received from this landing.
5.71 / 12 = 0.475
This is how much the lead costs using Landing B.
Let's do the same mathematical equation to find out how much a lead from Landing A costs:
0.002 x 2793 = 5.586
5.586 / 16 =0.349
As you can see, the lead still comes out cheaper. But the cost of a lead and the percentage of CR are not the most important.
You also need to watch the Approval Rate.
Approval for landing B is about 8%, while for landing A it is about 18%.
Thus, it becomes clear which of the landings is pulling you down and needs to be turned off.
The same approach is used with prelandings.
Creating black / white lists.
We have created a dedicated lesson that covers everything you need to know about black/white lists, which you can read here:
https://cpa.house/blog/how-to-create-blackwhite-lists-58
OS optimization.
Do not forget about this important parameter.
By looking at your statistics, you can immediately understand which segment gives you more approval.
We will tell you how to do this, as well as the logic of this optimization.
Why do some OS systems give more profit than others?
Everything is simple here, it is believed that users of newer phones with newer OS have more money, and because of that this traffic is more willing to pay.
But, there are also those who support a completely different point of view. Many believe that users of newer phones are more educated and therefore they are not interested in buying dietary supplements.
But everything is not so categorical in real life, so you need to watch how traffic interacts with each campaign and offer. After the initial test period, it will be possible to understand which OS will convert and which will not.
Let's look at an example:
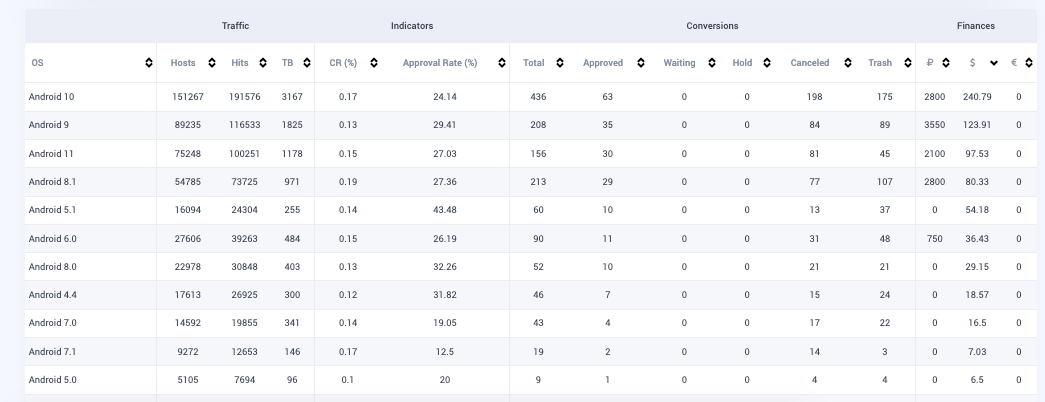
These are the statistics of the Brasillian Spider Super Set (IQ) offer
Here you can clearly see that the approval was quite bad on Android 7 and slightly better on Android 8.1. If we calculate, this version of the OS is not good for us, by removing such OS versions we can increase our earnings and ROI.
Calculating everything is very easy, but it requires traffic, so no matter how much you want to start optimizing your campaigns from day one, we strongly do not recommend doing this. Wait until you get at least 10 approved lead to optimize by OS versions.
Also, if most of your leads are pending, do not rush to optimize, wait until the statuses change, positively or negatively, this will help you make hypotheses correctly.
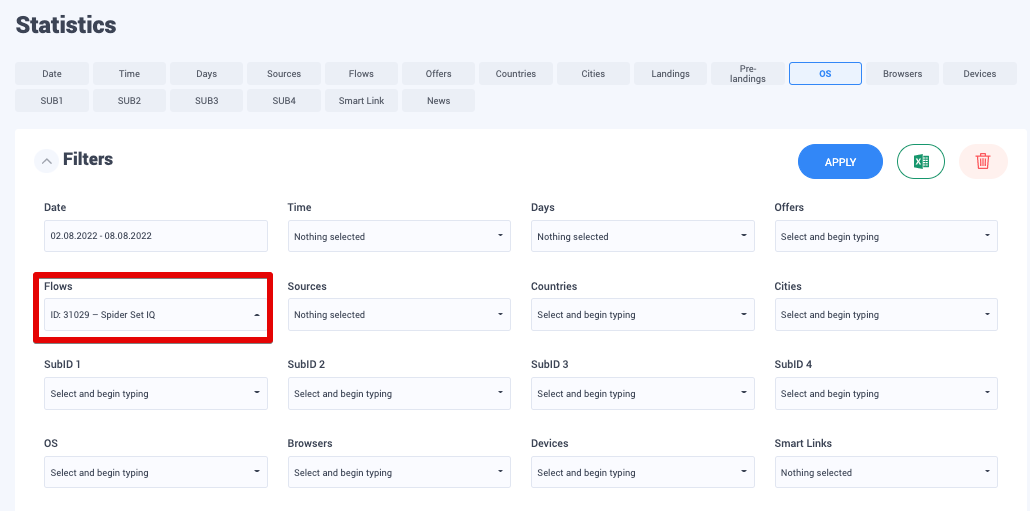
And so, if you have already driven some leads and feel that you are ready to optimize, go to the "Statistics" tab and select "OS".

Here, select your flow from the "Flows" drop down menu, and click "Apply".
Now you will see statistics of your traffic by OS versions. Calculate how much you spent on each version and how much profit it gave you back, if you are in the red for some versions (and there aren’t 30 pending leads), then confidently turn off these versions in your campaign.
How to calculate?
Multiply the number of clicks for a given OS version by your CPC bid and compare the resulting amount with the amount of profit this version gave you. If you spent more than you have received, by all means, disable this OS version.
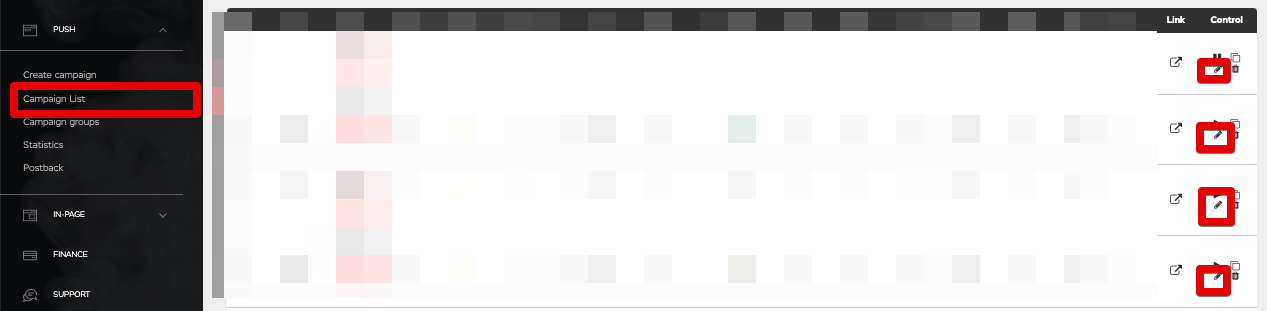
How to disable unnecessary OS versions in Push.House?
Go to your account in Push.House, then go to Push >> List of campaigns. Click on the pencil icon in our campaign to edit it.
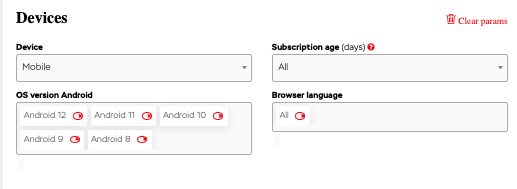
Inside the campaign editing page, find the "Android OS Version" parameter. Remove the "All" option and select only the versions you need, which are the ones most profitable.
Now scroll down, and click "Save".
That's all you have to do to optimize your campaigns by OS versions.
Optimization by browser languages.
If you remember, in the last lesson we did a campaign for the United Arab Emirates and I said that it would be necessary to optimize for browser languages.
Now, it's time to learn how to do it right.
You see, in many countries the population speaks 2 or more languages. Some speak two main languages, as in Canada, English and French. And in others, such as India, more languages are used. In Indonesia, for example, there are up to 700 languages. 😱
In multilingual countries, offers are created separately for each segment of the population, since it is difficult to recruit a multilingual CC and calculate all the logistics of deliveries. Therefore, each advertiser aims only at a segment of the population. We, affiliates, need to do the same, because we don't want to waste our money on traffic we won’t be paid for. Therefore, one of the easiest solutions for targeting is the language of the browser.
Of course, as with any target tool in affiliate marketing, it is not a fact that you will be able to cut off 100% of unnecessary traffic. There is always the inevitability of exceptions.
But logically speaking, it's still safe to say that the likelihood that a French-speaking user, for example, will set their browser to Chinese is low. This can happen, but in 95% of cases, the user sets the browser language to their native language.
First, in order to correctly use the browser language in targeting, you need to know how many languages are used in the GEO you need and in what percentage.
If your GEO has one official language, as in England, for example, you do not need to use this function at all. Both Russians and Indians or Asians can live in England for work or study. They may use a browser language that is closer to them, but it is almost certain that everyone living in England speaks English. Thus, its better to skip this step so as not to miss out on potential buyers.
But if you work with such GEOs as the Emirates or India, then the first thing you need to look at is the language of the offer. If the language of the offer is English, then they immediately let you know that it is better to target only expats living in the Emirates. Here you don’t even have to wait for statistics, and immediately set the browser language targeting to "English". In other GEOs, it makes sense to wait for the statistics and see what language will drive more leads. For example, in my personal opinion, in Egypt, no browser language other than Arabic is converting at all. Although this is a country where only one language is spoken, I always choose the Arabic language of the browser when working with this GEO. There may be a lot of explanations for this, but they are not important to us, if my statistics show that 20% of my traffic goes to devices with an English browser language and there are 0 conversions coming from then, then it’s best to just get rid of this segment and increase the ROI of my campaign.
So, let’s go to our dashboard in CPA.House, select "Statistics". In order for analytics by browser language to be displayed, we need to specify the desired macro when setting up the flow. To do this, use the {lang} macro in one of the four SubIDs.
If you did not register this macro when setting up your campaign, you will not be able to see statistics by language.
But it's okay, there is a little life hack that you can use if you forgot to use this tracking macro or you simply don't have a place to use it. Just target the language of the offer. It means if the language of the offer is in English, select the English language of the browser, regardless of the statistics. This way you will get into 100% of the target audience in terms of language.
How to remove/add browser languages?
Go to your dashboard in Push.House. Go to Push >> List of campaigns. Click on the pencil icon in our campaign to edit it.
On the campaign page, look for the "Browser Language" parameter, delete the "All" parameter there and select the language(s) you need.

Now scroll down, click "Save".
Not so difficult, right?
Feed optimization:
This is only suitable for those who have activated traffic from feeds.
We have already understood that not all sites give equally good approval rates, the same goes for feeds. Some feeds can work better or worse with your offers, and in order to save your budget from draining dry, they also need to be optimized.
To do this, go to the "Statistics" section in your CPA.House account and select the SubID corresponding to the {feed} macro, if you did everything by default, it will be SubID 3.
Here you need to select the flow you need, so you can see all the feeds from which you received traffic, volumes and the percentage of approval ratel.
Feeds are third-party databases that have many sites, so do not rush to turn off the feed completely if leads are coming from one specific feed, but still the total costs are more than profit, it is better to optimize the feed itself than to turn it off completely. How to do this will be described below.
We will disable only those feeds that do not give any leads at all.
How to disable unnecessary feeds:
Having collected the list of feeds that you want to disable, go to your account in Push.House, click Push >> List of campaigns. Select the desired campaign and click on the "edit" icon. Scroll down to the "Feeds" section and turn off the checkbox next to the feeds you do not need.
Click "Save" and you're done!
How to create a blacklist for a separate feed:
If you want to optimize sites inside a separate feed, go to the statistics in CPA.House, then go to the subid responsible for the {site} macro, by default it will be subid 1. Select the flow you need and go to the "SubID_3" parameter, enter the feed you need there, feed-65, for instance. Click “Apply”.
You now have a list of sites only from the feed you selected. Now the process of creating blacklists is no different from the standard one, which we discussed before.
That's all, we hope this basic optimization was useful to you. If you would like to see the next part of the course, please write your wishes in the comments, we will be very happy to hear them.


Cool support
If you have any questions, you can write to any of our managers

